Executing Workflows using Pegasus WMS
Material by Karan Vahi and Gideon Juve
Pegasus WMS
The Pegasus Project encompasses a set of technologies that help workflow-based applications execute in a number of different environments including desktops, campus clusters, grids, and clouds. Pegasus bridges the scientific domain and the execution environment by automatically mapping high-level workflow descriptions onto distributed resources. It automatically locates the necessary input data and computational resources necessary for workflow execution.Pegasus enables scientists to construct workflows in abstract terms without worrying about the details of the underlying execution environment or the particulars of the low-level specifications required by the middleware. Some of the advantages of using Pegasus includes:
Portability / Reuse - User created workflows can easily be run in different environments without alteration. Pegasus currently runs workflows on top of Condor, Grid infrastrucutures such as Open Science Grid and TeraGrid, Amazon EC2, Nimbus, and many campus clusters. The same workflow can run on a single system or across a heterogeneous set of resources.
Performance - The Pegasus mapper can reorder, group, and prioritize tasks in order to increase the overall workflow performance.
Scalability - Pegasus can easily scale both the size of the workflow, and the resources that the workflow is distributed over. Pegasus runs workflows ranging from just a few computational tasks up to 1 million. The number of resources involved in executing a workflow can scale as needed without any impediments to performance.
Provenance - By default, all jobs in Pegasus are launched via the kickstart process that captures runtime provenance of the job and helps in debugging. The provenance data is collected in a database, and the data can be summaries with tools such as pegasus-statistics, pegasus-plots, or directly with SQL queries.
Data Management - Pegasus handles replica selection, data transfers and output registrations in data catalogs. These tasks are added to a workflow as auxiliary jobs by the Pegasus planner.
Reliability - Jobs and data transfers are automatically retried in case of failures. Debugging tools such as pegasus-analyzer helps the user to debug the workflow in case of non-recoverable failures.
Error Recovery - When errors occur, Pegasus tries to recover when possible by retrying tasks, by retrying the entire workflow, by providing workflow-level checkpointing, by re-mapping portions of the workflow, by trying alternative data sources for staging data, and, when all else fails, by providing a rescue workflow containing a description of only the work that remains to be done.
Introduction
Use a browser to open the tutorial on github, located at: http://github.com/arokem/2013-09-16-ISI
A presentation on Pegasus that gives an introduction to workflows and Pegasus and will be presented by the instructor can be found here
This tutorial will take you through the steps of creating and running a simple workflow using Pegasus. This tutorial is intended for new users who want to get a quick overview of Pegasus concepts and usage. The tutorial covers the creating, planning, submitting, monitoring, debugging, and generating statistics for a simple diamond-shaped workflow. More information about the topics covered in this tutorial can be found in later chapters of this user's guide.
All of the steps in this tutorial are performed on the command-line. The convention we will use for command-line input and output is to put things that you should type in bold, monospace font, and to put the output you should get in a normal weight, monospace font, like this:
    [user@host dir]$ you type this
    you get this
Where [user@host dir]$ is the terminal prompt, the text you should type is "you type this", and the output you should get is "you get this". The terminal prompt will be abbreviated as $. Because some of the outputs are long, we don’t always include everything. Where the output is truncated we will add an ellipsis '...' to indicate the omitted output.
If you are having trouble with this tutorial, or anything else related to Pegasus, you can contact the Pegasus Users mailing list at pegasus-users@isi.edu to get help.
Getting started
In order to reduce the amount of work required to get started we have provided several virtual machines that contain all of the software required for this tutorial. Virtual machine images are provided for VirtualBox. Information about starting the bootcamp VM is in the Virtualbox Lesson. Please follow the instructions for starting the VM before continuing with this tutorial.
Generating the workflow
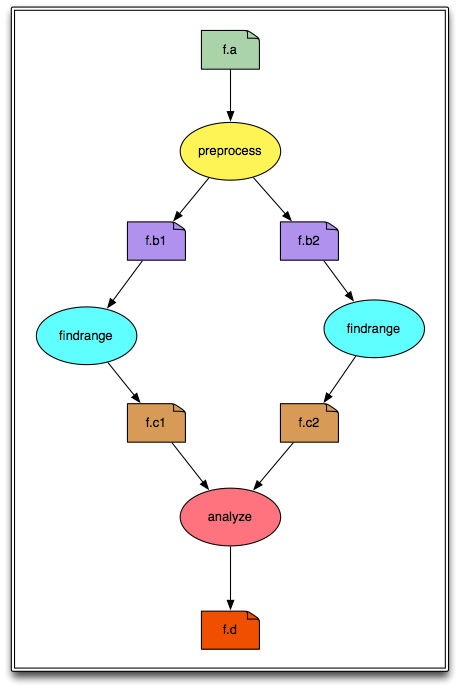
We will be creating and running a simple diamond-shaped workflow that looks like this:
The shell is a program that presents a command line interface which allows you to control your computer using commands entered with a keyboard instead of controlling graphical user interfaces (GUIs) with a mouse/keyboard combination.
In the above diagram, the ovals represent computational jobs, the dog-eared squares are files, and the arrows are dependencies.
Pegasus reads workflow descriptions from DAX files. The term "DAX" is short for "Directed Acyclic Graph in XML". DAX is an XML file format that has syntax for expressing jobs, arguments, files, and dependencies.
In order to create a DAX it is necessary to write code for a DAX generator. Pegasus comes with Perl, Java, and Python libraries for writing DAX generators. In this tutorial we will show how to use the Python library.
The DAX generator for the diamond workflow is in the file generate_dax.py. Look at the file by typing:
more generate_dax.py
...
The code has 5 sections:
A few system libraries and the Pegasus.DAX3 library are imported. The search path is modified to include the directory with the Pegasus Python library.
The name for the DAX output file is retrieved from the arguments.
A new ADAG object is created. This is the main object to which jobs and dependencies are added.
Jobs and files are added. The 4 jobs in the diagram above are added and the 6 files are referenced. Arguments are defined using strings and File objects. The input and output files are defined for each job. This is an important step, as it allows Pegasus to track the files, and stage the data if necessary. Workflow outputs are tagged with "transfer=true".
Dependencies are added. These are shown as arrows in the diagram above. They define the parent/child relationships between the jobs. When the workflow is executing, the order in which the jobs will be run is determined by the dependencies between them.
Generate a DAX file named diamond.dax by typing:
$ ./generate_dax.py diamond.dax
Creating ADAG...
Adding preprocess job...
Adding left Findrange job...
Adding right Findrange job...
Adding Analyze job...
Adding control flow dependencies...
Writing diamond.dax
The diamond.dax file should contain an XML representation of the diamond workflow. You can inspect it by typing:
$ more diamond.dax
...
Information Catalogs
There are three information catalogs that Pegasus uses when planning the workflow. These are the:
Site Catalog
The site catalog describes the sites where the workflow jobs are to be executed. Typically the sites in the site catalog describe remote clusters, such as PBS clusters or Condor pools. In this tutorial we assume that you have a Personal Condor pool running on localhost. If you are using one of the tutorial VMs this has already been setup for you.
The site catalog is in sites.xml:
$ more sites.xml
...
There are two sites defined in the site catalog: "local" and "PegasusVM". The "local" site is used by Pegasus to learn about the submit host where the workflow management system runs. The "PegasusVM" site is the personal Condor pool running on your (virtual) machine. In this case, the local site and the PegasusVM site refer to the same machine, but they are logically separate as far as Pegasus is concerned.
The local site is configured with a "storage" file system that is mounted on the submit host (indicated by the file:// URL). This file system is where the output data from the workflow will be stored. When the workflow is planned we will tell Pegasus that the output site is "local".
The PegasusVM site is configured with a "scratch" file system accessible via SCP (indicated by the scp:// URL). This file system is where the working directory will be created. When we plan the workflow we will tell Pegasus that the execution site is "PegasusVM".
The local site also has an environment variable called SSHPRIVATEKEY that tells Pegasus where to find the private key to use for SCP transfers. If you are running this tutorial on your own machine you will need to set up a passwordless ssh key and add it to authorized_keys. If you are using the tutorial VM this has already been set up for you.
Pegasus supports many different file transfer protocols. In this case the site catalog is set up so that input and output files are transferred to/from the PegasusVM site using SCP. Since both the local site and the PegasusVM site are actually the same machine, this configuration will just SCP files to/from localhost, which is just a complicated way to copy the files.
Finally, the PegasusVM site is configured with two profiles that tell Pegasus that it is a plain Condor pool. Pegasus supports many ways of submitting tasks to a remote cluster. In this configuration it will submit vanilla Condor jobs.
Transformation Catalog
The transformation catalog describes all of the executables (called "transformations") used by the workflow. This description includes the site(s) where they are located, the architecture and operating system they are compiled for, and any other information required to properly transfer them to the execution site and run them.
For this tutorial, the transformation catalog is in the file tc.dat:
$ more tc.dat
...
The tc.dat file contains information about three transformations: preprocess, findrange, and analyze. These three transformations are referenced in the diamond DAX. The transformation catalog indicates that all three transformations are installed on the PegasusVM site, and are compiled for x86_64 Linux.
The actual executable files are located in the bin directory. All three executables are actually symlinked to the same Python script. This script is just an example transformation that sleeps for 30 seconds, and then writes its own name and the contents of all its input files to all of its output files.
Replica Catalog
The final catalog is the Replica Catalog. This catalog tells Pegasus where to find each of the input files for the workflow.
All files in a Pegasus workflow are referred to in the DAX using their Logical File Name (LFN). These LFNs are mapped to Physical File Names (PFNs) when Pegasus plans the workflow. This level of indirection enables Pegasus to map abstract DAXes to different execution sites and plan out the required file transfers automatically.
The Replica Catalog for the diamond workflow is in the rc.dat file:
$ more rc.dat
# This is the replica catalog. It lists information about each of the
# input files used by the workflow.

# The format is:
# LFN     PFN    pool="SITE"

f.a    file:///home/tutorial/input/f.a    pool="local"
This replica catalog contains only one entry for the diamond workflow’s only input file. This entry has an LFN of "f.a" with a PFN of "file:///home/tutorial/input/f.a" and the file is stored on the local site, which implies that it will need to be transferred to the PegasusVM site when the workflow runs. The Replica Catalog uses the keyword "pool" to refer to the site. Don't be confused by this: the value of the pool variable should be the name of the site where the file is located from the Site Catalog.
Configuring Pegasus
In addition to the information catalogs, Pegasus takes a configuration file that specifies settings that control how it plans the workflow.
For the diamond workflow, the Pegasus configuration file is relatively simple. It only contains settings to help Pegasus find the information catalogs. These settings are in the pegasus.conf file:
$ more pegasus.conf

# This tells Pegasus where to find the Site Catalog
pegasus.catalog.site=XML3
pegasus.catalog.site.file=sites.xml

# This tells Pegasus where to find the Replica Catalog
pegasus.catalog.replica=File
pegasus.catalog.replica.file=rc.dat

# This tells Pegasus where to find the Transformation Catalog
pegasus.catalog.transformation=Text
pegasus.catalog.transformation.file=tc.dat
Planning the Workflow
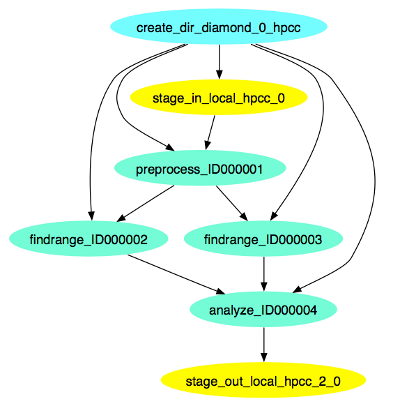
The planning stage is where Pegasus maps the abstract DAX to one or more execution sites. The planning step includes:
Adding a job to create the remote working directory.
Adding stage-in jobs to transfer input data to the remote working directory.
Adding cleanup jobs to remove data from the remote working directory when it is no longer needed.
Adding stage-out jobs to transfer data to the final output location as it is generated.
Adding registration jobs to register the data in a replica catalog.
Task clustering to combine several short-running jobs into a single, longer-running job. This is done to make short-running jobs more efficient.
Adding wrappers to the jobs to collect provenance information so that statistics and plots can be created when the workflow is finished.
The pegasus-plan command is used to plan a workflow. This command takes quite a few arguments, so we created a plan_dax.sh wrapper script that has all of the arguments required for the diamond workflow:
$ more plan_dax.sh
...
The script invokes the pegasus-plan command with arguments for the configuration file (--conf), the DAX file (-d), the submit directory (--dir), the execution site (--sites), the output site (-o) and two extra arguments that prevent Pegasus from removing any jobs from the workflow (--force) and that prevent Pegasus from adding cleanup jobs to the workflow (--nocleanup).
Top plan the diamond workflow invoke the plan_dax.sh script with the path to the DAX file:
$ ./plan_dax.sh diamond.dax
2012.07.24 21:11:03.256 EDT:

I have concretized your abstract workflow. The workflow has been entered
into the workflow database with a state of "planned". The next step is to
start or execute your workflow. The invocation required is:

pegasus-run  /home/tutorial/submit/tutorial/pegasus/diamond/run0001


2012.07.24 21:11:03.257 EDT:   Time taken to execute is 1.103 seconds
Note the line in the output that starts with pegasus-run. That is the
command that we will use to submit the workflow. The path it contains
is the path to the submit directory where all of the files required to
submit and monitor the workflow are stored.
This is what the diamond workflow looks like after Pegasus has finished planning the DAX:
Submitting the Workflow
Once the workflow has been planned, the next step is to submit it to DAGMan/Condor for execution. This is done using the pegasus-run command. This command takes the path to the submit directory as an argument. Run the command that was printed by the plan_dax.sh script:
$ pegasus-run submit/tutorial/pegasus/diamond/run0001
-----------------------------------------------------------------------
File for submitting this DAG to Condor       : diamond-0.dag.condor.sub
Log of DAGMan debugging messages             : diamond-0.dag.dagman.out
Log of Condor library output                 : diamond-0.dag.lib.out
Log of Condor library error messages         : diamond-0.dag.lib.err
Log of the life of condor_dagman itself      : diamond-0.dag.dagman.log

Submitting job(s).
1 job(s) submitted to cluster 19.
-----------------------------------------------------------------------

Your Workflow has been started and runs in base directory given below

cd submit/tutorial/pegasus/diamond/run0001

*** To monitor the workflow you can run ***

pegasus-status -l submit/tutorial/pegasus/diamond/run0001

*** To remove your workflow run ***
pegasus-remove submit/tutorial/pegasus/diamond/run0001
Monitoring the Workflow
After the workflow has been submitted you can monitor it using the pegasus-status command:
$ pegasus-status submit/tutorial/pegasus/diamond/run0001
STAT  IN_STATE  JOB
Run      01:48  diamond-0
Run      00:05   |-findrange_ID0000002
Run      00:05   \_findrange_ID0000003
Summary: 3 Condor jobs total (R:3)

UNREADY   READY     PRE  QUEUED    POST SUCCESS FAILURE %DONE
      2       0       0       3       0       3       0  37.5
Summary: 1 DAG total (Running:1)
This command shows the workflow (diamond-0) and the running jobs (in the above output it shows the two findrange jobs). It also gives statistics on the number of jobs in each state and the percentage of the jobs in the workflow that have finished successfully.
Use the watch option to continuously monitor the workflow:
$  pegasus-status -w submit/tutorial/pegasus/diamond/run0001
...
You should see all of the jobs in the workflow run one after the other. After a few minutes you will see:
(no matching jobs found in Condor Q)
UNREADY   READY     PRE  QUEUED    POST SUCCESS FAILURE %DONE
      0       0       0       0       0       8       0 100.0
Summary: 1 DAG total (Success:1)
That means the workflow is finished successfully. You can type ctrl-c to terminate the watch command.
If the workflow finished successfully you should see the output file f.d in the output directory. This file was created by the various transformations in the workflow and shows all of the executables that were invoked by the workflow:
$ more outputs/f.d
/home/tutorial/bin/analyze:
/home/tutorial/bin/findrange:
/home/tutorial/bin/preprocess:
This is the input file of the diamond workflow
/home/tutorial/bin/findrange:
/home/tutorial/bin/preprocess:
This is the input file of the diamond workflow Remember that the example transformations in this workflow just print their name to all of their output files and then copy all of their input files to their output files.
Debugging the Workflow
In the case that one or more jobs fails, then the output of the pegasus-status command above will have a non-zero value in the FAILURE column.
You can debug the failure using the pegasus-analyzer command. This command will identify the jobs that failed and show their output. Because the workflow succeeded, pegasus-analyzer will only show some basic statistics about the number of successful jobs:
$ pegasus-analyzer submit/tutorial/pegasus/diamond/run0001
pegasus-analyzer: initializing...

****************************Summary***************************

 Total jobs         :      7 (100.00%)
 # jobs succeeded   :      7 (100.00%)
 # jobs failed      :      0 (0.00%)
 # jobs unsubmitted :      0 (0.00%)
If the workflow had failed you would see something like this:

$ pegasus-analyzer submit/tutorial/pegasus/diamond/run0002
pegasus-analyzer: initializing...

**************************Summary*************************************

 Total jobs         :      7 (100.00%)
 # jobs succeeded   :      2 (28.57%)
 # jobs failed      :      1 (14.29%)
 # jobs unsubmitted :      4 (57.14%)

**********************Failed jobs' details****************************

====================preprocess_ID0000001==============================

 last state: POST_SCRIPT_FAILED
       site: PegasusVM
submit file: preprocess_ID0000001.sub
output file: preprocess_ID0000001.out.003
 error file: preprocess_ID0000001.err.003

-----------------------Task #1 - Summary-----------------------------

site        : PegasusVM
hostname    : ip-10-252-31-58.us-west-2.compute.internal
executable  : /home/tutorial/bin/preprocess
arguments   : -i f.a -o f.b1 -o f.b2
exitcode    : -128
working dir : -

-------------Task #1 - preprocess - ID0000001 - stderr---------------

FATAL: The main job specification is invalid or missing.
In this example I removed the bin/preprocess executable and re-planned/re-submitted the workflow (that is why the command has run0002). The output of pegasus-analyzer indicates that the preprocess task failed with an error message that indicates that the executable could not be found.
Collecting Statistics
The pegasus-statistics command can be used to gather statistics about the runtime of the workflow and its jobs. The -s all argument tells the program to generate all statistics it knows how to calculate:
$ pegasus-statistics -s all submit/tutorial/pegasus/diamond/run0001

**************************SUMMARY******************************
# legends
# Workflow summary:
#       Summary of the workflow execution. It shows total
#       tasks/jobs/sub workflows run, how many succeeded/failed etc.
#       In case of hierarchical workflow the calculation shows the
#       statistics across all the sub workflows.It shows the following
#       statistics about tasks, jobs and sub workflows.
#
#     * Succeeded - total count of succeeded tasks/jobs/sub workflows.
#     * Failed - total count of failed tasks/jobs/sub workflows.
#     * Incomplete - total count of tasks/jobs/sub workflows that are
#       not in succeeded or failed state. This includes all the jobs
#       that are not submitted, submitted but not completed etc. This
#       is calculated as  difference between 'total' count and sum of
#       'succeeded' and 'failed' count.
#     * Total - total count of tasks/jobs/sub workflows.
#     * Retries - total retry count of tasks/jobs/sub workflows.
#     * Total Run - total count of tasks/jobs/sub workflows executed
#       during workflow run. This is the cumulative of retries,
#       succeeded and failed count.
# Workflow wall time:
#       The walltime from the start of the workflow execution to the
#       end as reported by the DAGMAN.In case of rescue dag the value
#       is the cumulative of all retries.
# Workflow cumulative job wall time:
#       The sum of the walltime of all jobs as reported by kickstart.
#       In case of job retries the value is the cumulative of all retries.
#       For workflows having sub workflow jobs (i.e SUBDAG and SUBDAX
#       jobs), the walltime value includes jobs from the sub workflows
#       as well.
# Cumulative job walltime as seen from submit side:
#       The sum of the walltime of all jobs as reported by DAGMan.
#       This is similar to the regular cumulative job walltime, but
#       includes job management overhead and delays. In case of job
#       retries the value is the cumulative of all retries. For workflows
#       having sub workflow jobs (i.e SUBDAG and SUBDAX jobs), the
#       walltime value includes jobs from the sub workflows as well.

-----------------------------------------------------------------------
Type            Succeeded  Failed  Incomplete  Total     Retries  Total Run
Tasks           4          0       0           4     ||  0        4
Jobs            7          0       0           7     ||  0        7
Sub Workflows   0          0       0           0     ||  0        0
-----------------------------------------------------------------------

Workflow wall time:                               3 mins, 25 secs, (205 s)
Workflow cumulative job wall time:                2 mins, 0 secs, (120 s)
Cumulative job walltime as seen from submit side: 2 mins, 0 secs, (120 s)

Summary: submit/tutorial/pegasus/diamond/run0001/statistics/summary.txt

************************************************************************
The output of pegasus-statistics contains many definitions to help users understand what all of the values reported mean. Among these are the total wall time of the workflow, which is the time from when the workflow was submitted until it finished, and the total cumulative job wall time, which is the sum of the runtimes of all the jobs.
The pegasus-statistics command also writes out several reports in the statistics subdirectory of the workflow submit directory:
$ ls submit/tutorial/pegasus/diamond/run0001/statistics/
breakdown.csv  jobs.txt          summary.txt         time.txt
breakdown.txt  summary-time.csv  time-per-host.csv   workflow.csv
jobs.csv       summary.csv       time.csv            workflow.txt
The file breakdown.txt, for example, has min, max, and mean runtimes for each transformation:
$ more submit/tutorial/pegasus/diamond/run0001/statistics/breakdown.txt
# legends
# Transformation - name of the transformation.
# Count          - the number of times the invocations corresponding to
#                  the transformation was executed.
# Succeeded      - the count of the succeeded invocations corresponding
#                  to the transformation.
# Failed         - the count of the failed invocations corresponding to
#                  the transformation.
# Min(sec)       - the minimum invocation runtime value corresponding to
#                  the transformation.
# Max(sec)       - the maximum invocation runtime value corresponding to
#                  the transformation.
# Mean(sec)      - the mean of the invocation runtime corresponding to
#                  the transformation.
# Total(sec)     - the cumulative of invocation runtime corresponding to
#                  the transformation.

# a1f5ba03-a827-4d0a-8d59-9941cbfbd83d (diamond)
Transformation   Count  Succeeded  Failed  Min     Max     Mean     Total
analyze          1      1          0       30.008  30.008  30.008   30.008
dagman::post     7      7          0       5.0     6.0     5.143    36.0
findrange        2      2          0       30.009  30.014  30.011   60.023
pegasus::dirmanager 1   1          0       0.194   0.194   0.194    0.194
pegasus::transfer 2     2          0       0.248   0.411   0.33     0.659
preprocess       1      1          0       30.025  30.025  30.025   30.025

# All
Transformation   Count  Succeeded  Failed  Min     Max     Mean     Total
analyze          1      1          0       30.008  30.008  30.008   30.008
dagman::post     7      7          0       5.0     6.0     5.143    36.0
findrange        2      2          0       30.009  30.014  30.011   60.023
pegasus::dirmanager 1   1          0       0.194   0.194   0.194    0.194
pegasus::transfer 2     2          0       0.248   0.411   0.33     0.659
preprocess       1      1          0       30.025  30.025  30.025   30.025
In this case, because the example transformation sleeps for 30 seconds, the min, mean, and max runtimes for each of the analyze, findrange, and preprocess transformations are all close to 30.
Job Clustering
A large number of workflows executed through the Pegasus WMS, are composed of several jobs that run for only a few seconds or so. Pegasus allows you to cluster these small running jobs together into a larger job at runtime.
Why do you want to do this:
The overhead of running any job on the grid is usually 60 seconds or more. Need to make this overhead worthwhile. Ideally the users should run a job that takes at least 10 minutes to execute.
Clustered tasks can reuse common input data - less data transfers.
Supported Job Clustering Techniques
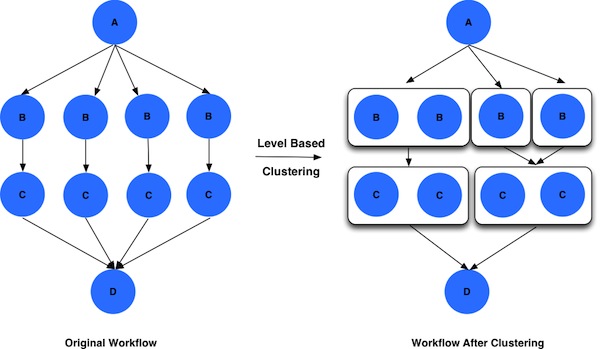
- Level Based - cluster jobs on the same level based on user provided parameters i.e number of clusters to be created.
- Runtime Based - cluster based on runtime of the jobs. users specify the expected runtime for the clustered job, and Pegasus does the binning per level.
- Label Based - user labels the sub graphs that they want clustered into a single job in the DAX.
To enable clustering in pegasus pass the --cluster option to pegasus-plan.
Here is how a worklfow looks before and after level based job clustering.
More details can be found in the Pegasus Documentation here.
Data Cleanup
Very often in case large workflows, users run out of disk space during the workflow execution.
Why does it occur:
- Workflows bring in huge amounts of data
- Additional data is generated during workflow execution
- Users don't worry about cleaning up the scratch filessytem after they have run their workflow.
What are the potential solutions:
Cleanup after the workflow as finished. This does not work all the time as scratch space may get filled up before execution.
Interleave the cleanuo automatically during the workflow execution.
- This requires an analysis of the workflow to determine when a file is no longer required.
The cleanup module in Pegasus adds cleanup nodes to the workflow at the planning time that remove datafrom the directory on the shared filesystem when it is no longer required by the workflow.
Pegasus also will cluster the cleanup jobs together to ensure that for large workflows the workflow walltime does not increase due to large number of cleanup jobs added.
This feature is used by a UCLA genomics researcher to delete TB's of data automatically for his long running pipelines.
Here is how a worklfow looks before and after adding data cleanup nodes.
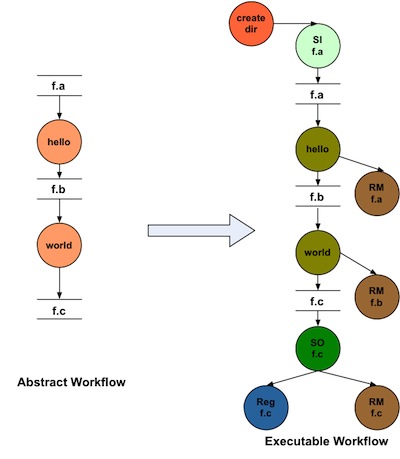
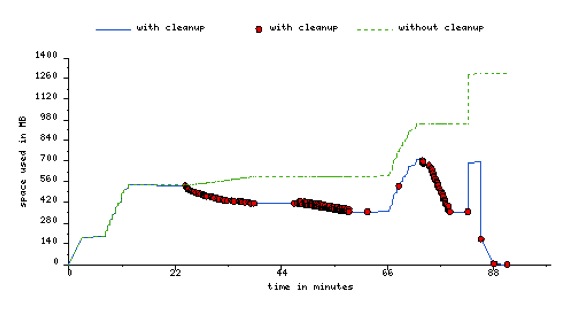
Using the cleanup feature, can reducie the peak storage requirements of the workflow.
Below is an image of peak storage used by a montage worklfow with data cleanup enabled.
Conclusion
Congratulations! You have completed the tutorial. You can try the RNASeq module to do execute a real world RNASeq workflow. That has both job clustering and data cleanup enabled.
Please contact the Pegasus Users Mailing list at pegasus-users@isi.edu if you need help.
